Building views
Understanding the grid system
In order to understand some of the features presented in the next sections, it is necessary to introduce the concept of Grid System, which has been adopted in the Beautiful WebForms Form Builder and views.
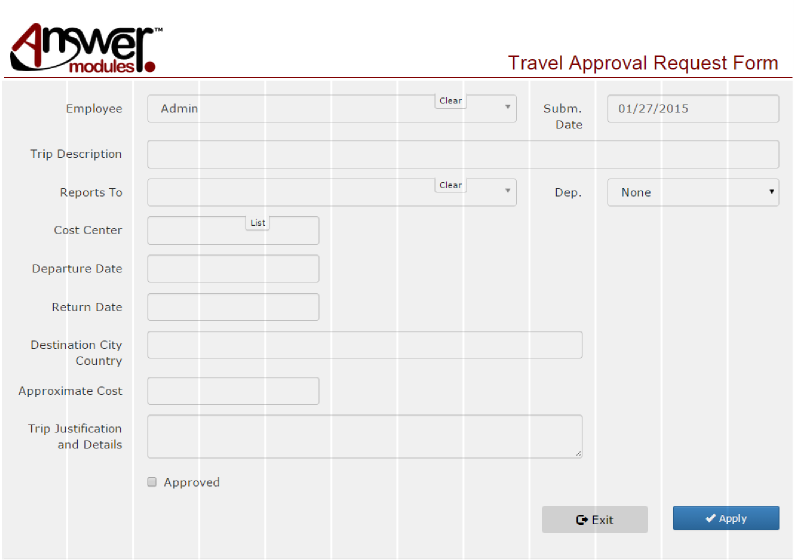
When creating or modifying a Form view, all of the widgets in the view appear neatly aligned to each other. The widgets can be modified in size only in discrete steps: that is, each widget can be assigned a size from a set of predefined options. When the view is presented to the user, the actual size of the widget will be proportional to the selected value.
To understand the logic behind this behaviour, you can imagine the Form fieldset area as if it was divided in a fixed number of columns (12 by default, 24 optional). By forcing each widget to span over a whole number of columns, we keep the overall layout of the form clean and tidy, eliminating the effort that is usually required to fine-tune the alignments and spacings. To better understand this concept, please take a look at the following image.
Additionally, the technology used for the grid layout is responsive. The form will automatically adjust to the size of the screen in which it is viewed, degrading gracefully in case of screen of small size.
In addition to the default 12-column grid, some of the built-in templates provided with Beautiful WebForms support a 24-column grid: this allows for a greater precision and more possibilities when creating the form layout. It is possible to configure the view to use one system or the other by toggling a menu in the Form Builder, as shown in the following sections.
Here after is an example presenting the same view as the previous example, but this time built on a 24-column grid.

Understanding the Beautiful WebForms request life-cycle
Beautiful WebForms implement a slightly different lifecycle if compared to standard forms, thanks to their custom submission mechanism.
How incoming requests are processed
Beautiful WebForms are managed through a dedicated endpoint. Upon submission, the underlying engine performs server side validation. Only after successful validation, the form data is eventually submitted to Content Server.
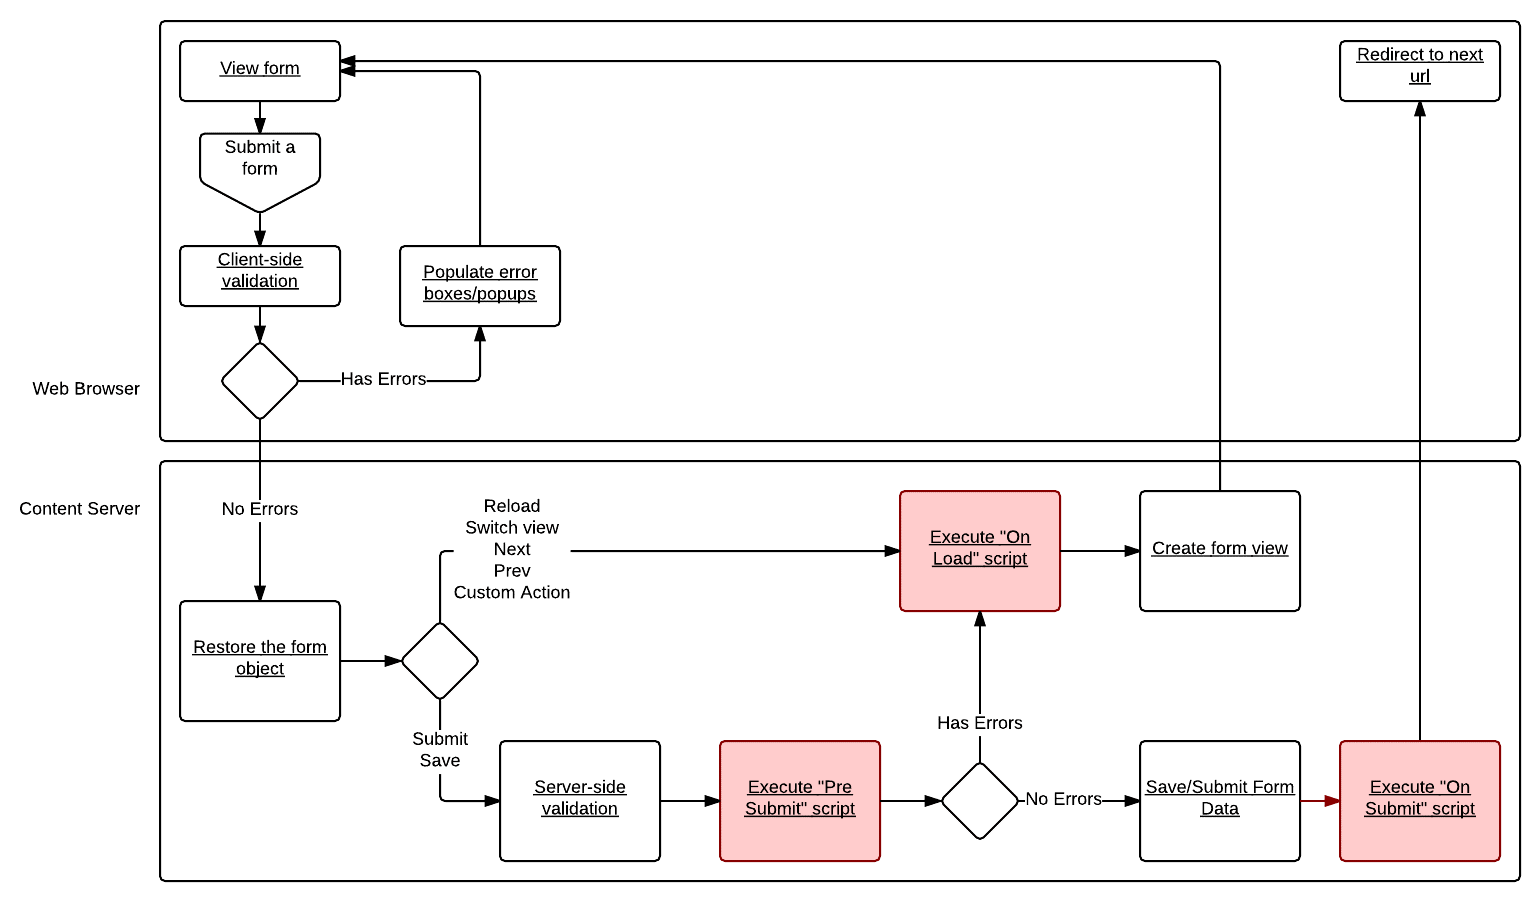
The Beautiful WebForms life-cycle management of incoming requests can be schematized in the following steps:
-
Form rendering request: a user requests the form
-
ON LOAD - Custom logic execution hook
-
Form view rendering: the form page is rendered
-
User data input: the user interacts with the form and populates the input fields
-
Form submit action: the user attempts to submit the form data
-
Client side validation: the client side library validates the input fields
-
Actual data submission to Beautiful WebForms endpoint: in case of successful validation, data is submitted to the server
-
Server side validation: the Beautiful WebForms engine performs server side validation on the submitted data
-
PRE SUBMIT - Custom logic execution hook
-
Actual data submission to Content Server: form data is submitted to Content Server
-
POST SUBMIT - Custom logic execution hook
-
A validation error in any of the validation steps would interrupt the flow and return to step 1. Error information would be added to the form view, and used to populate inline error messages.
In case of validation errors, the data input by the user is preserved for the following view rendering.
Lifecycle schema
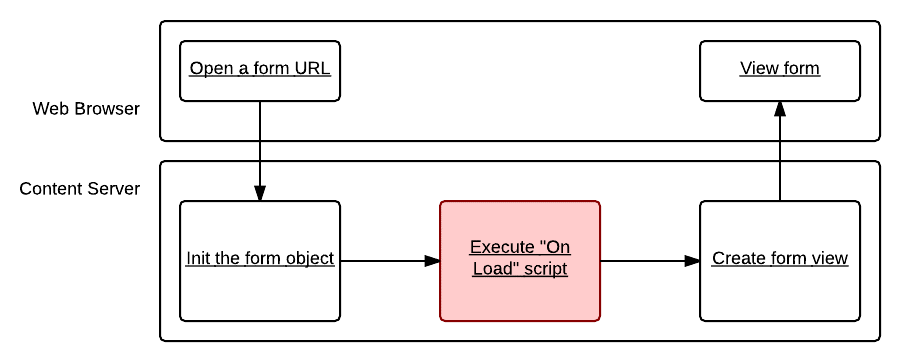
The following schema considers a scenario in which a new form is requested by a user:
The following schema is related to a scenario in which the user attempts to submit the form (or otherwise performs an action that triggers a round trip to the server):
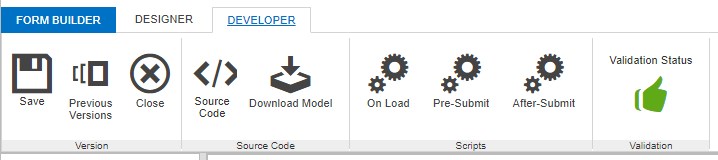
Custom Logic Execution Hooks (CLEH)
In the two schemas above, there are several highlighted boxes that represent Custom Logic execution hooks. That is, steps in which it is possible to add customized business logic, in the form of Content Script code.
The scripts are:
-
ON LOAD view Content Script: this is the typical hook for prepopulating the form and manipulating the form view
-
PRE SUBMIT view Content Script: this is the typical hook for extended validation and actions that must be performed before that the data is actually saved
-
POST SUBMIT view Content Script: this is the typical hook for post submit actions (user notifications, document manipulation on content server, etc.)
Starting with version 1.7.0, Beautiful WebForms Views have been transformed in container objects. Content Scripts associated to Beautiful WebForms views are standard Content Script nodes in the view container. The nodes are associated to the lifecycle steps by name
Throughout the whole process and in all of these scripts, a form object is available in the execution context. This object allows to fetch and manipulate the form data, as well as programmatically add or remove validation errors.
The Content Script objects associated to each execution hook can be accessed and edited through the Specific Properties tab of the Beautiful WebForm view object.
The Content Scripts associated with CLEHs are regular Content Script objects. In the Script Context the Beautiful WebForms framework will inject additional items, such as the form object, which represents the form that is currently associated to the view.
The form object grant access to the form fields structure and the current values of each field, the form submitted data, the validation rules associated to the form, and provides utilities to manipulate this information.
E.g.
A commonly used function in the "ON LOAD view script" is
form.isFirstLoad()
The function allows to define actions which are executed only once per form view (the actions are not repeated in case of submission failure - for example, in case of validation errors). Typically, field prepopulation happens here.
The following sections provide information on common tasks that can be performed on the form programmatically in the various Content Scripts.
Managing form fields values
The state of the forms can be programmatically accessed and modified through the Content Script Custom Logic Execution Hooks.
In scripts, form field values can be accessed using the following notation:
form.*normalizedname*.value
where 'normalizedname' is the name of the field after normalization performed by the Beautiful WebForms framework.
Auto completion
Use the CTRL+Space keyboard shortcut to access autocomplete options on the form object. Options include all the fields in the form.
The rules applied when normalizing field names are:
-
the only admitted characters are alphanumeric characters and whitespaces (using different characters can lead to unexpected behavior)
-
all characters are transformed in lowercase
-
all characters immediately after a whitespace are transformed in uppercase
As a rule of thumb, it is advised to adopt a naming convention for field names that would be compatible with SQL table column names.
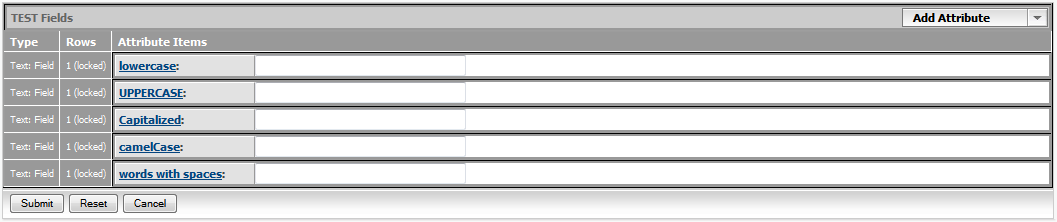
To better understand the concept, consider the following Form Template, containing a few fields (using different possible naming conventions):
-
a field named 'lowercase'
-
a field named 'UPPERCASE'
-
a field named 'Capitalized'
-
a field named 'camelCase'
-
a field named 'words with spaces'
The fields can be accessed in a script as follows:
-
'lowercase': form.lowercase.value
-
'UPPERCASE': form.uppercase.value
-
'Capitalized': form.capitalized.value
-
'camelCase': form.camelcase.value
-
'words with spaces': form.wordsWithSpaces.value
1 2 3 4 5 | form.lowercase.value = "TEST VALUE A" //Form template field name: lowercase form.uppercase.value = "TEST VALUE B" //Form template field name: UPPERCASE form.capitalized.value = "TEST VALUE C" //Form template field name: Capitalized form.camelcase.value = "TEST VALUE D" //Form template field name: camelCase form.wordsWithSpaces.value = "TEST VALUE E" ////Form template field name: words with spaces |
// Initalize form field values: some examples
form.lowercase.value = “TEST VALUE A” // Form template field name: lowercase
form.uppercase.value = “TEST VALUE B” // Form template field name: UPPERCASE
form.capitalized.value = “TEST VALUE C” // Form template field name: Capitalized
form.camelcase.value = “TEST VALUE D” // Form template field name: camelCase
form.wordsWithSpaces.value = “TEST VALUE E” // Form template field name: words with spaces
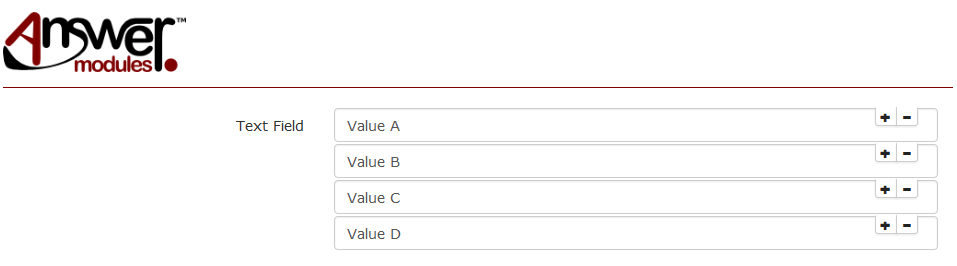
The resulting form (after initialization):

Adding and removing values from multivalue fields
In case of multi-value fields, it is possible to programmatically add new values (up to the max-values limit)
For each field, multiple values can be accessed directly by index (0-based).
By default, if a field value is accessed without specifying an index, the referenced value is the one with index 0.
form.textvalue.value = "My value" is equivalent to form.textvalue[0].value = "My value"
NOTE: The value at index 0 does not require initialization.
To access values at index > 0:
form.textvalue.addField(1)
form.textvalue[1].value = "My value"
Example. Field initialization:
1 2 3 4 5 6 7 8 9 10 | form.textField.value = "Value A" // The first field (index:0) is always available. no need to add this. form.addField("textField", 1) // Additional field's values can be added either through the form object form.textField.addField(2) // or directly on the field form.textField[1].value = "Value B" form.textField[2].value = "Value C" form.textField.addField(3) form.textField[3].value = "Value D" |
The resulting form (after initialization):
Form actions
An action is a piece of server side scripting code that is execute in response of a particular type of request.
The action to be performed is identified by the request parameter (am_Action) submitted with the form.
Another optional parameter (am_ActionParams) is sometimes included when specific information is
required by the action.
Standard form actions
The framework is capable of handling a set of predetermined actions as part of the Beautiful WebForms lifecycle.
The following are the standard action managed by the framework:
| Action | Description | Action ID (am_Action) | Action parameter (am_ActionParams) usage |
|---|---|---|---|
| Reload | Performs a round trip to the server and re-renders the form view. | am_reload |
not required |
| Save | Saves the current state of the form, without submitting. Available in Workflow forms only | am_save |
not required |
| Exit | Exits without saving modifications to the form data | am_exit |
not required |
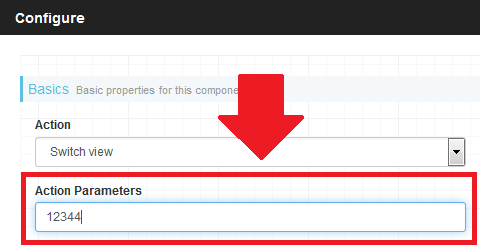
| Switch View | Switches the view and re-renders the form | am_switchView |
The ID of the target view |
| Next | To be used together with "prev" to create a wizard-like experience, enabling the switching forwards through a sequence of different views | am_wizardNext |
The ID of the next view. Alternatively, the target view can be configured on server side by setting the value of: form.viewParams.am_wizardNextView |
| Prev | To be used together with "next" to create a wizard-like experience, enabling the switching backwards through a sequence of different views | am_wizardBack |
The ID of the previous view. If not and a "Next" action was invoked beforehand, the framework will attempt to switch back to that view. Alternatively, the target view can be configured on server side by setting the value of: form.viewParams.am_wizardPrevView |
Standard form actions can be selected by using the Standard Action Button component.

The Standard Action Button component can be configured through the configuration panel to select the appropriate action
Whenever a parameter is required by the selected action (see above table) the appropriate value can be configured as follows:
Custom form actions
It is also possible to define custom actions when submitting a form. In this case, the custom actions should be handled in the Content Script Custom Logic Execution Hooks.
Custom form actions can be selected by using the Custom Action Button component.
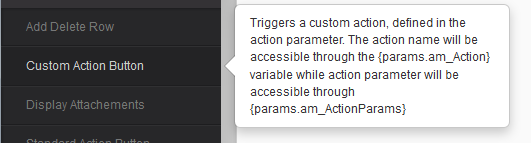
In this case, the configuration panel allows to specify a value for the name of the action and the value of the (optional) actionParams
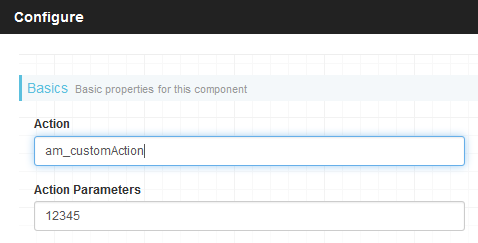
Whenever the button is used, the information related to action and actionParams will be available in the request params. It can be easily accessed as follows:
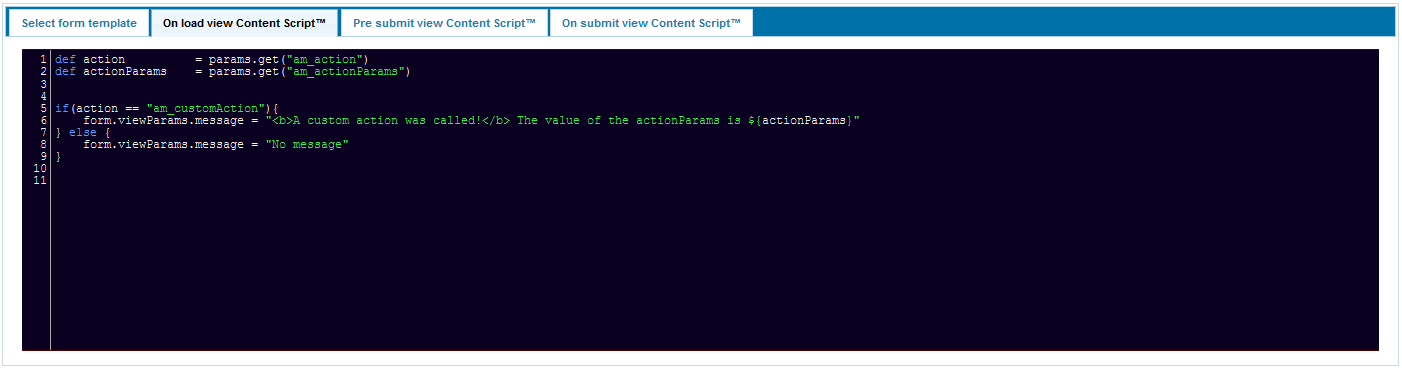
1 2 | def action = params.get("am_action") def actionParams = params.get("am_actionParams") |
Below is a simple example showing how to use and manage a Custom Action:
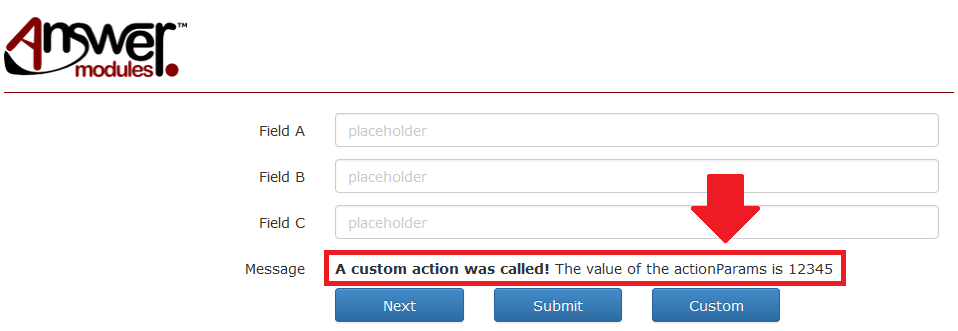
Invoking an action
It is possible to manually trigger the execution of Actions in cases where the provided Form Components are not sufficient to meet specific needs.
In such cases, the am_setAction(form, action, actionParams) javascript
function can be used, where:
-
form is the id of the html form (eg.
form_258191) -
action is the action id (eg.
am_customAction) -
actionParams is the optional value of additional parameters required by the action (eg. '12345')
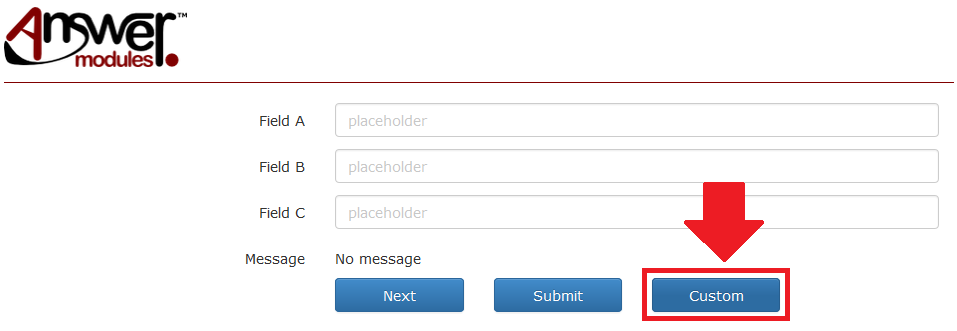
The following is an example using an HTML button:
1 2 3 | <button onclick="am_setAction('form_258191','am_customAction','12345')" type="submit"> Custom Action Button </button> |
Attaching Custom information and data to a Beautiful WebForms view
ViewParams
It is sometimes necessary to bind to the form object additional parameters and values that are not supposed to be stored in form fields. It is the case for parameters that are only needed to control the form page layout: an example is when the HTML template containing the form can be dynamically configured in some of its parts (for example, a title or logo).
To address this need, the 'form' object is bound to a data map (named 'viewParams') which is meant to contain additional parameters that are not supposed to be persisted with the form data.
Entries in the 'viewParams' map can be set and accessed programmatically as in the following examples.
Example 1. Within a Content Script, set the value of the parameter 'title':
1 | form.viewParams.title = "My Form" |
Example 2. Within a Content Script, read the value of the parameter 'title' and store the value in a variable 'myVar':
1 | def myVar = form.viewParams.title |
Example 3. When accessing the 'viewParams' in an HTML Form Template, the syntax is slightly different, as the templating engine syntax must be used. For example:
1 | <h1>$form.viewParams.title</h1> |
You can include a '!' in your expression in order to avoid printing the output in the rendered HTML in case the value of the variable is not set:
1 | <h1>$!form.viewParams.title</h1> |
Serializable
any object programmatically added to the 'viewParams' map MUST be a serializable object.
ViewParams variables
Prior of each view rendering, the Beautiful Form Frameworks injects in the viewParams field of the Form object a set of variables. The number and type of these variables depend on the current execution scope. All the variables at the moment of the injection are serialized as String. The table here below summarizes all the possible variables that can be found in the viewParams field, indicating for each of them, the original type and name.
Warning
the actual case of the variable names could depend on the underlying database.
List of the variable automatically injected into the ViewParams map
| Variable Name | Scope | Original Type |
|---|---|---|
| LL_CgiPath | Form, Workflow | String |
| LL_NextURL | Form, Workflow | String |
| LL_SupportPath | Form, Workflow | String |
| LL_UserContact | Form, Workflow | String |
| LL_UserFirstName | Form, Workflow | String |
| LL_UserFullName | Form, Workflow | String |
| LL_UserGroupName | Form, Workflow | String |
| LL_UserID | Form, Workflow | Integer |
| LL_UserLastName | Form, Workflow | String |
| LL_UserLogin | Form, Workflow | String |
| LL_UserMailAddress | Form, Workflow | String |
| LL_UserMiddleName | Form, Workflow | String |
| LL_UserTitle | Form, Workflow | String |
| MapTask_CustomData | Workflow | Assoc |
| MapTask_Description | Workflow | String |
| MapTask_Form | Workflow | Assoc |
| MapTask_Instructions | Workflow | String |
| MapTask_Priority | Workflow | Integer |
| MapTask_StartDate | Workflow | Date |
| MapTask_SubMapID | Workflow | Integer |
| MapTask_SubType | Workflow | Integer |
| MapTask_Type | Workflow | Integer |
| Map_Description | Workflow | String |
| Map_Instructions | Workflow | String |
| Map_SubType | Workflow | Integer |
| Map_Type | Workflow | Integer |
| SubWorkTask_DateDone | Workflow | Date |
| SubWorkTask_DateDue_Max | Workflow | Date |
| SubWorkTask_DateDue_Min | Workflow | Date |
| SubWorkTask_DateMilestone | Workflow | Date |
| SubWorkTask_DateReady | Workflow | Date |
| SubWorkTask_Flags | Workflow | Integer |
| SubWorkTask_IterNum | Workflow | Integer |
| SubWorkTask_PerformerID | Workflow | Integer |
| SubWorkTask_Status | Workflow | Integer |
| SubWorkTask_SubWorkID | Workflow | Integer |
| SubWorkTask_TaskID | Workflow | Integer |
| SubWorkTask_Title | Workflow | String |
| SubWorkTask_Type | Workflow | Integer |
| SubWorkTask_WaitCount | Workflow | Integer |
| SubWorkTask_WorkID | Workflow | Integer |
| SubWork_DateCompleted | Workflow | Date |
| SubWork_DateDue_Max | Workflow | Date |
| SubWork_DateDue_Min | Workflow | Date |
| SubWork_DateInitiated | Workflow | Date |
| SubWork_Flags | Workflow | Integer |
| SubWork_MapID | Workflow | Integer |
| SubWork_Project | Workflow | Dynamic |
| SubWork_ReturnSubWorkID | Workflow | Integer |
| SubWork_ReturnTaskID | Workflow | Integer |
| SubWork_Status | Workflow | Integer |
| SubWork_SubWorkID | Workflow | Integer |
| SubWork_Title | Workflow | String |
| SubWork_WorkID | Workflow | Integer |
| Work_DateCompleted | Workflow | Date |
| Work_DateDue_Max | Workflow | Date |
| Work_DateDue_Min | Workflow | Date |
| Work_DateInitiated | Workflow | Date |
| Work_Flags | Workflow | Integer |
| Work_ManagerID | Workflow | Integer |
| Work_OwnerID | Workflow | Integer |
| Work_Status | Workflow | Integer |
| Work_WorkID | Workflow | Integer |
Form Components that make use of 'viewParams' values.
Various components available in the Form Builder are configurable and require one or more parameters to be programmatically set: these parameters can be made available to the component as values in the 'viewParams' container variable.
The widgets library
The Widgets library is an extensible set of form widgets that can be used through the drag & drop visual editor. To simplify the navigation, the widgets are arranged in families of objects with similar functionalities.
The mapping between form template fields and their default input widget used to initialize Beautiful WebForms Views can be customized by configuring the desired CSFormSnippet in the Content Script Volume. |
To add a new widget:
-
Open the widget library group that contains the widget
-
Click on the widget, holding the mouse button down
-
Drag the widget to the desired position in the working area (an highlighted box will appear)
-
Drop the widget in the working area
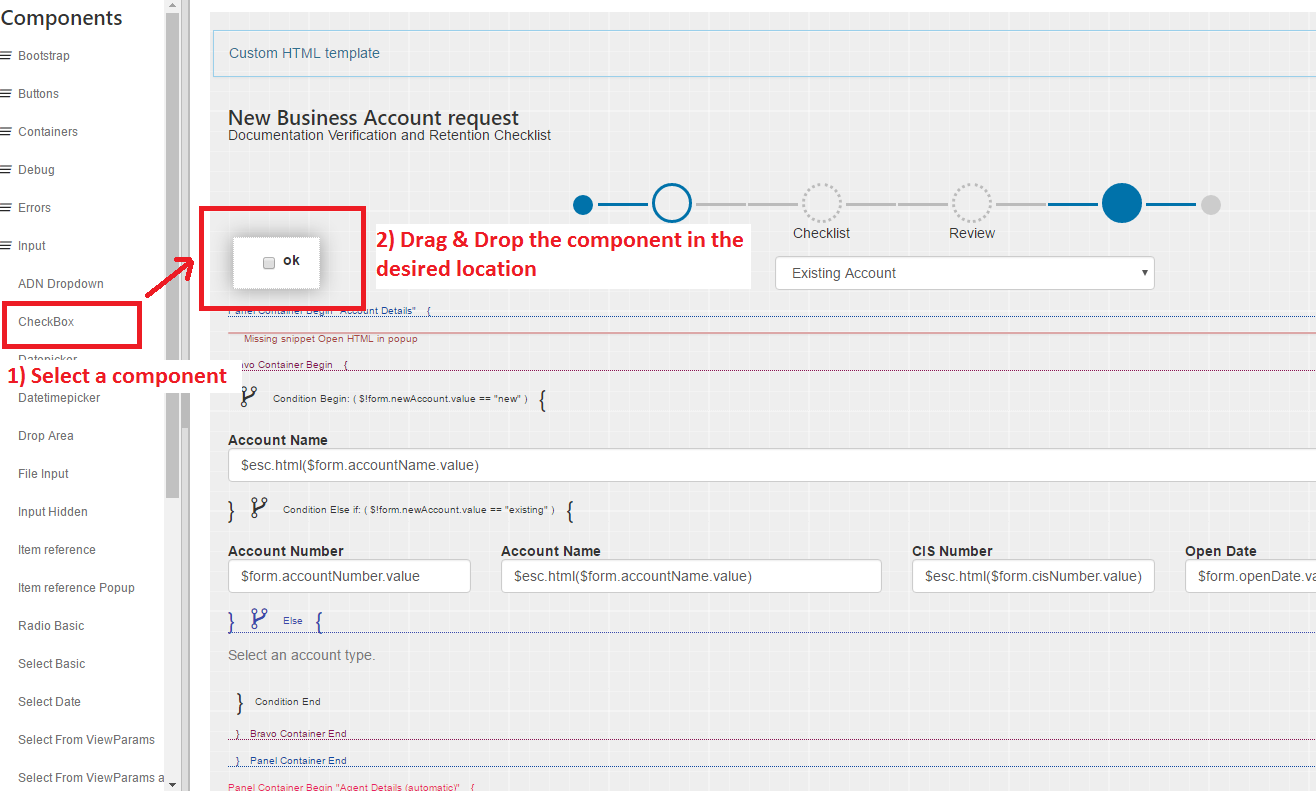
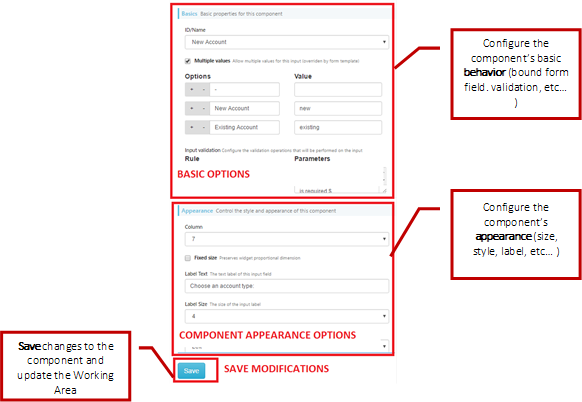
The widget configuration panel
When a widget in the Main Working Area is selected, the Configuration Panel can be activated through the dedicated menu option or by right-clicking the widget. The content of the panel is specific to the type of widget, and allows to define the widget binding to underlying form fields (in case of input widgets), as well as how the widget will be rendered, what validation rules will be applied to it, and any other setting that could be necessary for the specific widget.
Beautiful WebForms View Templates
The BWF Framework enforces the Model View Controller paradigm, in fact Beautiful WebForms Views (and Templates) are always processed, before being rendered, from the module’s internal Templating engine. At rendering time the BWF framework creates (as Model) for the Form View an Execution Context very similar to the one used by the Content Script Engine. The main difference between the two contexts is the presence of the "form" variable that refers to a server side representation of the Form object to which the Form View has been associated. As discussed each BWF View can be associated to a Form Template. At rendering time the framework executes the following operations:
-
Substitutes in the Form Template any occurrences of the tag <am:form /> with the content of the Form View as defined, for example, using the Form Builder
-
Evaluates the result of the previous operation with the internal Templating Engine
The most important consequence of the aforementioned rendering procedure is that any valid Templating expression present both in the View and in the Template will be evaluated and eventually substituted by the Templating engine. This feature is widely used by default Form Templates and default Form Snippets.
Default Form Templates make use of this characteristics of the framework to slightly change their aspect, resulting behaviors, or more simple to load the most appropriate static resources (i.e. javascript libraries and CSS stylesheets).
For developers convenience the BWF frameworks defines also a set of macro that simplify the creation of new templates or the management of existing one. In the following section the source code of these macro is listed.
Customize the way validation error messages are rendered
In order to customize the way validation error messages related to form's fields are displayed you can override the following three javascript functions in your view.
1 2 3 4 5 6 7 8 9 10 11 12 13 14 15 16 17 18 19 20 21 22 23 24 25 26 27 28 29 30 31 32 33 34 35 36 37 38 39 40 41 42 43 44 45 | function am_zcleanFieldValidationError(comp){ var wrapper =comp.closest('.am-form-input-wrap') wrapper.removeClass('am-has-error-tooltip') wrapper.removeClass('has-error') wrapper.data("title", "").attr("title", ""); try { wrapper.tooltip("destroy") } catch (e) { amgui.log.debug("Error cleaning validation error message"+e); } } function am_zcleanFormValidationError(form){ form.find('.help-block.has-error').remove(); form.find('.am-form-input-wrap').removeClass('has-error'); form.find('.am-has-error-tooltip').each( function() { $(this).removeClass('am-has-error-tooltip').data("title", "") .attr("title", "") try { $(this).tooltip("destroy") } catch (e) { amgui.log.debug("Error cleaning validation error message"+e); } }); } function am_zdisplayValidationError(message, failingElements){ $(failingElements).each( function() { var wrapper = $(this).closest('.am-form-input-wrap') try { wrapper.addClass("am-has-error-tooltip").addClass( 'has-error').attr( "title", ((wrapper.data("title") != undefined) ? wrapper .data("title") : "") + " " + message); wrapper.tooltip("destroy") wrapper.tooltip() } catch (e) { amgui.log.debug("Error displaying validation error message"+e); } }); } |