Extending Content Script
Create a Custom Service
One of the most important feature of ModuleSuite is its extensibility. ModuleSuite has been in fact designed in order to let you extend it, creating new services, new components, widgets, code snippets etc..
Creating a new service it's particularly helpful when it comes to integrate other services and/or systems, or to leverage existing libraries to extend the Content Server capabilities. Creating your extension in the form of a new Content Script service you will automatically benefit from all the existing ModuleSuite features such as, for example, the full support of the Content Script Editor.
New services can be easily created by using the Content Script SDK. The Content Script SDK is a toolkit that can be used by developers to create custom Content Script services. Services created with the SDK can be seamlessly deployed in the target Content Server instance, and be accessible within Content Script code.
The suggested way to setup and use the Content Script SDK is by using the well-known Eclipse IDE.
The SDK is shipped in the form of an Eclipse Maven project. The project includes all the interfaces required for integration within Content Script, and can be used as a template to create a custom service.
Content Script SDK setup
-
Download Eclipse Luna SR2 (https://eclipse.org/downloads/packages/eclipse-ide-java-developers/lunasr2c*) *
-
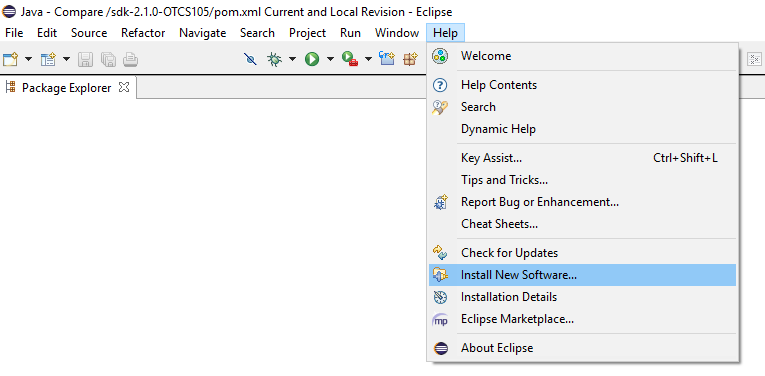
Run Eclipse. Use the Help > Install new software option to install some required additional components
-
Install Maven2Eclipse components
-
add the update site (http://download.eclipse.org/technology/m2e/releases/)
-
install the components: m2e - Maven integration for Eclipse, m2e - slfj over logback logging (Optional)

-
-
In your workspace folder, unpack the contents of the Content Script SDK archive
-
Import the unpacked project within your new Eclipse environment.
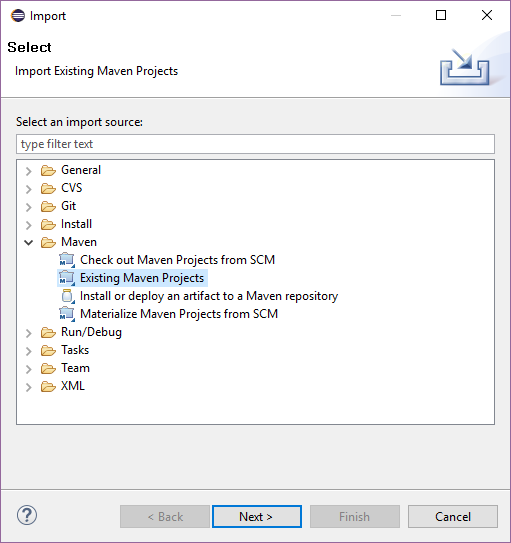
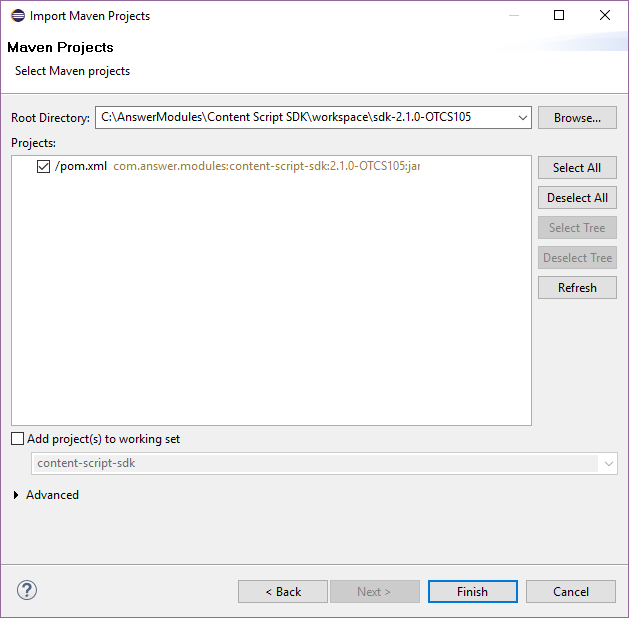
Navigate to the workspace folder and select the project directory, the project is identified by its pom.xml (Project Object Model) file. The Content Script SDK pom should appear in the listing.
Once selected, proceed with import.
-
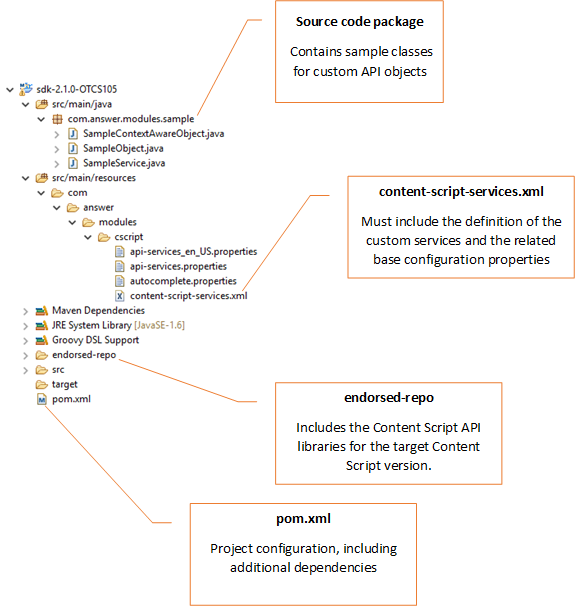
Review the imported SDK project layout
-
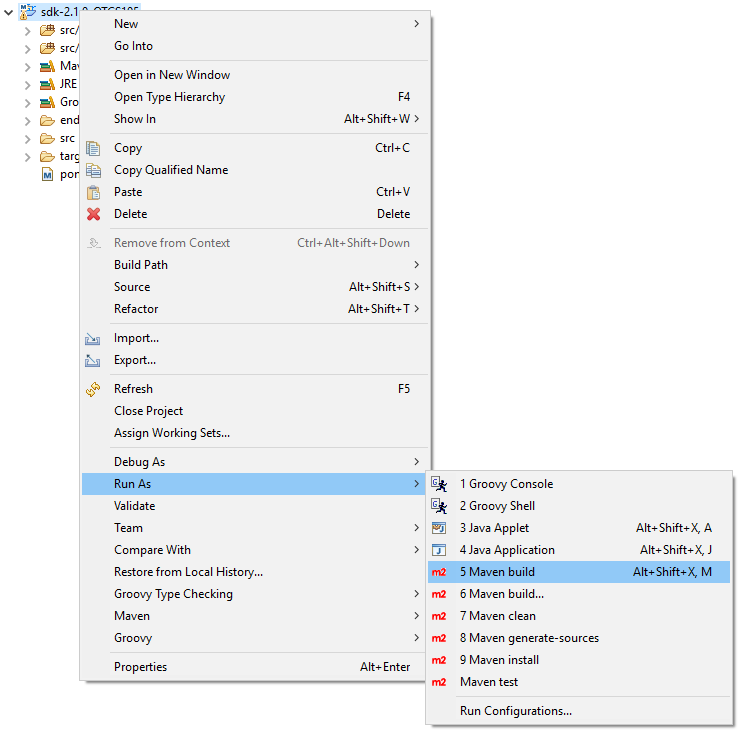
Build the project using the Maven menu options.
-
Deploy the newly created service on your Content Server instance. The main artifact produced by a project build is a jar file containing the service classes. In order to install the custom services to the target OTCS instance, copy the jar file to: <OTCS_Home>/module/anscontentscript_X_Y_Z/amlib
 Each service might load as many dependencies as it needs, service’s dependencies are loaded with an high isolation level, thus several services might load the same dependency (same library) or even load different version of the same dependency (different version of the same library). Service’s dependencies are loaded by default from a folder stored under
 /module/anscontentscript_X_Y_Z/amlib having the same name as the service identifier. Service’s dependencies can be specified using the POM file you can find in the SDK project. E.g. Upon build, an additional target folder will include all direct and indirect dependencies needed at runtime:<dependency> <groupId>berkeleydb</groupId> <artifactId>berkeleydb</artifactId> <version>1.5.1</version> </dependency>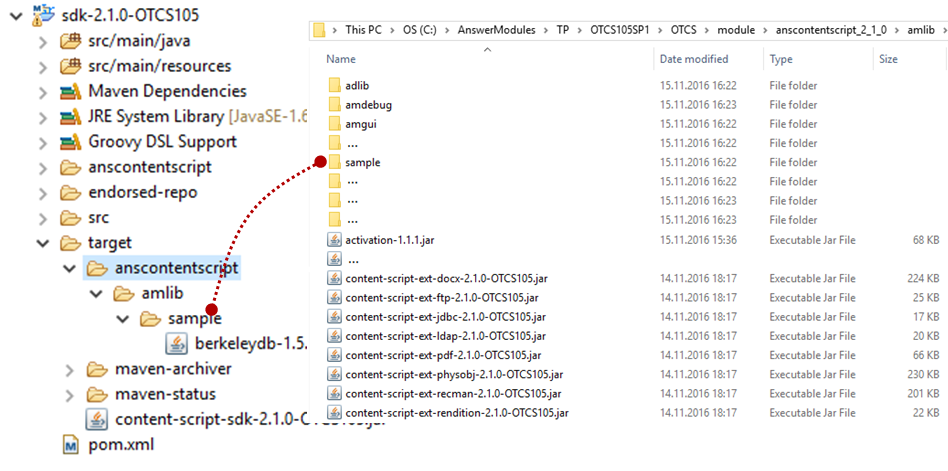
content-script-services.xml – Service description file
In order to let ModuleSuite be aware of your new service you have to properly describe it using the content-script-service.xml file. This xml files allows you not just to describe your service but also to provide some basic configuration for it.
The base structure of the file is as follows:
<?xml version="1.0" encoding="UTF-8" ?>
<services>
 <service id="sample" extRepoId="sample" class="com.answer.modules.sample.SampleService">
  <properties>
   <property name="sample.aProperty"
             description="A property with a default value (default: 'default')">default</property>
   <property name="sample.aSecret" type="hidden"
             description="A property with a hidden value"></property>
   <property name="sample.aNumber"
             description="A property with a numeric value (default: 1)">1</property>
   </properties>
  </service>
  <service id="anotherSample" extRepoId="sample" class="com.answer.modules.sample.ASampleService">
   <properties>
    <property name="sample.aProperty"
              description="A property with a default value (default: 'default')">default</property>
    <property name="sample.aSecret" type="hidden"
              description="A property with a hidden value"></property>
    <property name="sample.aNumber"
              description="A property with a numeric value (default: 1)">1</property>
    </properties>
  </service>
 </services>